Replacing nginx with axum
2024-10-13
For the last seven years, I've been reaching for nginx when I wanted to host something that was facing the public internet. Mostly as a reverse-proxy, but also for static sites. My webservers tend to accumulate features over time (like all software, I guess) and after a while, I have multiple services running under different subdomains, some being protected using basic auth, and of course TLS in front of everything. Roughly a year ago, I replaced my private server's nginx setup with a handwritten one using axum.
Axum is a Rust library to write web services, and I'm maintaining one at $work that is using it. I'm a big fan of axum, because it makes it incredibly easy to create webservices. Nginx is not super hard to configure, but it's also not easy. With these two evaluations in my head, it seemed like a good idea to replace nginx with a server using axum.
This way, I would only need to do a basic server setup (sshd config, fail2ban, etc.), copy the server binary onto the server, place a single service file, and call it a day.
Axum 101
Obviously, this whole endeavour is based on the fact that I'm much more comfortable with axum than I am with nginx. If you don't know axum, you would probably not agree with me. So let me give you a quick tour.
Axum is a library to write web services that expose an http api. A hello world in axum looks like this:
use axum::{
    routing::get,
    Router,
};

#[tokio::main]
async fn main() {
    // build our application with a single route
    let app = Router::new().route("/", get(|| async { "Hello, World!" }));

    // run our app with hyper, listening globally on port 3000
    let listener = tokio::net::TcpListener::bind("0.0.0.0:3000").await.unwrap();
    axum::serve(listener, app).await.unwrap();
}
This example and all other examples in this section were taken from axum's
doc page. Most axum apps have the same
structure: you create a Router, add handlers to it via the route() method,
create a TcpListener, and serve the Router via that listener.
What makes axum so powerful, is how you create those handlers. You can set the
http method via a simple function call (get in the example). Here is an example
that creates multiple handlers:
use axum::{Router, routing::get};

// our router
let app = Router::new()
    .route("/", get(root)) f
    // /foo has a get and a post handler
    .route("/foo", get(get_foo).post(post_foo))
    .route("/foo/bar", get(foo_bar));

// which calls one of these handlers
async fn root() {}
async fn get_foo() {}
async fn post_foo() {}
async fn foo_bar() {}
And it's also very easy to extract data from a request, for example:
use axum::{
    extract::{Path, Query},
    routing::get,
    Router,
};
use uuid::Uuid;
use serde::Deserialize;

let app = Router::new().route("/users/:id/things", get(get_user_things));

// a function that is used as query, can take arguments that implement axums
// FromRequest or FromRequestParts traits. Those are called extractors.
// Axum provides many pre made extractors for example Path, Query and Json
async fn get_user_things(
    Path(user_id): Path<Uuid>,
    pagination: Option<Query<Pagination>>,
) {
    let Query(pagination) = pagination.unwrap_or_default();

    // ...
}

// An instance of this type will be created by the Query extractor
#[derive(Deserialize)]
struct Pagination {
    page: usize,
    per_page: usize,
}

impl Default for Pagination {
    fn default() -> Self {
        Self { page: 1, per_page: 30 }
    }
}
If you used code like this on a server, and someone sends a get request to
http://your.server.org/user/10/things?page=2&per_page=50, axum will extract
the user id and the query fields for you.
You don't need more info that this to understand 80% of all axum code I've
ever written. But there is one other thing to be aware of, when you use
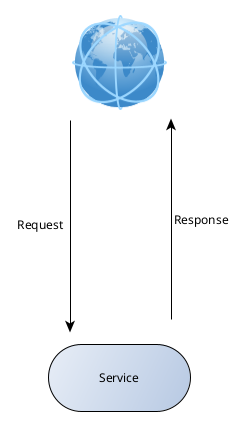
axum: it is based on tower. At the heart
of tower is the Service trait. A service is anything that gets data from the
internet and returns some data. In the case of Axum that means receiving Http
requests, and returning Http responses. The handlers from the examples above
are services, but the router is too. Tower allows you to layer services, which
is where the name comes from, I assume.
If you just use a single handler, the situation looks like this:
But if you use a second service, as a layer for the first one, the situation looks like this:
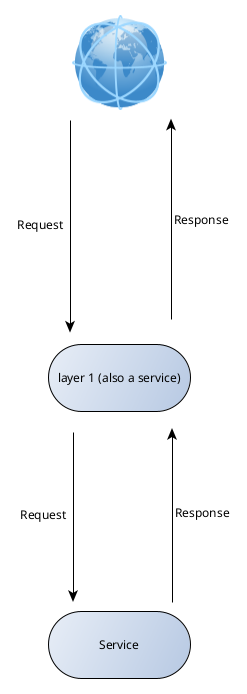
A layer can also decide not to call the next layer, and immediately return.
In axum, you can add layers via the layer() method, that most types have.
For a deep dive into this, I'd recommend taking a look axum's
middleware documentation,
and at the tower-guides.
But that should not be necessary to understand the remainder of this article.
There is a crate tower-http, that already provides lots of useful layers for http servers.
A simple static site
I hope, you now have a rough idea of how axum works, so let's get back to the main topic of this article. The code you need to host a simple static site with axum looks like this:
use axum::Router;
use tower_http::services::ServeDir;

#[tokio::main]
async fn main() {
    let app = Router::new().nest_service("/", ServeDir::new("/tmp/serve_dir"));
    let listener = tokio::net::TcpListener::bind("0.0.0.0:3000").await.unwrap();
    axum::serve(listener, app).await.unwrap();
}
This is only slightly more text than an equivalent nginx config has. Besides axum, this also uses tower-http and tokio. That's already three libraries, and it's about to become a few more. I know this is a trigger for some people, but these libraries are what allows us to host a static site with three lines of code (use statements and the main definition don't count, at least in my eyes).
Two static sites with different subdomains
The next level of complexity is two static sites that run on different subdomains.
The following example is a webserver that hosts two different static sites.
One at site1.my.domain and one at site2.my.domain. Because we might want
to test the webserver locally (btw, also something that's hard to do with nginx), we
add a commandline parameter --production, and only host on the two domains above if
it was provided. Otherwise, we host at site1.localhost:3000 and site2.localhost:3000.
use axum::{
    body::Body,
    extract::Host,
    handler::HandlerWithoutStateExt,
    http::{Request, StatusCode},
    response::IntoResponse,
    Router,
};
use tower::ServiceExt;
use tower_http::services::ServeDir;

#[tokio::main]
async fn main() {
    let site1_svc = Router::new().nest_service("/", ServeDir::new("/tmp/serve_dir"));
    let site2_svc = Router::new().nest_service("/", ServeDir::new("/tmp/serve_dir2"));

    let debug_mode = !std::env::args().any(|x| x == "--production");
    let (name_site1, name_site2) = if debug_mode {
        (
            "site1.localhost:3000".to_string(),
            "site2.localhost:3000".to_string(),
        )
    } else {
        (
            "site1.my.domain".to_string(),
            "site2.my.domain".to_string(),
        )
    };

    // define a handler that routes to our services depending on the hostnames
    let host_name_router = move |Host(hostname): Host, request: Request<Body>| async move {
        if hostname == name_site1 {
            site1_svc.oneshot(request).await
        } else if hostname == name_site2 {
            site2_svc.oneshot(request).await
        } else {
            Ok(StatusCode::NOT_FOUND.into_response())
        }
    };

    // hand everything off to axum
    let app = Router::new().route_service("/", host_name_router.into_service());
    let listener = tokio::net::TcpListener::bind("0.0.0.0:3000").await.unwrap();
    axum::serve(listener, app).await.unwrap();
}
The arg parse code would probably be replaced by a crate like clap in a more complex program. The most important new bit here, is this part:
// define a handler that routes to our services depending on the hostnames
let host_name_router = move |Host(hostname): Host, request: Request<Body>| async move {
    if hostname == name_site1 {
        site1_svc.oneshot(request).await
    } else if hostname == name_site2 {
        site2_svc.oneshot(request).await
    } else {
        Ok(StatusCode::NOT_FOUND.into_response())
    }
};
We define a handler that does the routing and forwards everything to the appropriate
service using the oneshot method. If no host name matches, we just return
an appropriate status code.
Let's put this into its own function though, because the ultimate goal is to have a very clear main function. This way, when we come back to the server six months later and have forgotten nearly everything about it, we are able to modify it easily.
pub fn mk_hostname_router(
    map: HashMap<String, Router>,
) -> BoxCloneService<Request<Body>, Response<Body>, Infallible> {
    BoxCloneService::new(
        (move |Host(hostname): Host, request: Request<Body>| async move {
            for (name, router) in map {
                if hostname == name {
                    return router.oneshot(request).await;
                }
            }

            Ok(StatusCode::NOT_FOUND.into_response())
        })
        .into_service(),
    )
}
The Service trait
is a bit unwieldy. It's much easier to return a BoxService
or a BoxCloneService depending
on whether it needs to be clonable.
So now, the main looks like this:
#[tokio::main]
async fn main() {
    let site1_svc = Router::new().nest_service("/", ServeDir::new("/tmp/serve_dir"));
    let site2_svc = Router::new().nest_service("/", ServeDir::new("/tmp/serve_dir2"));

    let debug_mode = !std::env::args().any(|x| x == "--production");
    let (name_site1, name_site2) = if debug_mode {
        (
            "site1.localhost:3000".to_string(),
            "site2.localhost:3000".to_string(),
        )
    } else {
        (
            "site1.my.domain".to_string(),
            "site2.my.domain".to_string(),
        )
    };

    // define a handler that routes to our services depending on the hostnames
    let hostname_router = mk_hostname_router([(name_site1, site1_svc), (name_site2, site2_svc)].into());

    // hand everything off to axum
    let app = Router::new().route_service("/", host_name_router.into_service());
    let listener = tokio::net::TcpListener::bind("0.0.0.0:3000").await.unwrap();
    axum::serve(listener, app).await.unwrap();
}
Reverse Proxy
Another common task many people use nginx for is reverse proxying. So let's see how we can build a reverse proxy service. We basically need a handler that's applied to every request, and makes a request itself, just to another server.
pub async fn reverse_proxy_http_handler(
    port: u16,
    State(client): State<Client>,
    mut req: Request,
) -> Result<Response, StatusCode> {
    // extract the query
    let path = req.uri().path();
    let path_query = req
        .uri()
        .path_and_query()
        .map(|v| v.as_str())
        .unwrap_or(path);

    // construct the new uri query from the port and the query
    let uri = format!("http://127.0.0.1:{port}{path_query}");

    // inject the new uri into the request
    *req.uri_mut() = Uri::try_from(uri).unwrap();

    // hand off the request
    Ok(client
        .request(req)
        .await
        .map_err(|_| StatusCode::BAD_REQUEST)?
        .into_response())
}
This function needs an http client, which we use hyper for. It will be provided
via the Router::with_state() method. Some reverse proxies would also require us
to tinker with the host names to work correctly (e.g. Syncthing), while other services
would prefer to get the request as it was originally, so you might want to adjust this
function a little, depending on your needs. Let's look at how we use this handler:
let rev_proxy_svc = Router::new().nest_service(
    "/",
    (|state, req| reverse_proxy_http_handler(3001, state, req)).with_state(client),
);
The client is passed via with_state(), so it's not recreated on every call. Additionally,
using with_state() turns the closure into a Service. You might want to take
a look at axum's
reverse proxy example
Some Auth
We probably want some protection for a service when it's publicly exposed to the internet, so let's add that:
    let rev_proxy_svc = Router::new()
        .route_service(
            "/",
            (|state, req| reverse_proxy_http_handler(3001, state, req)).with_state(client),
        )
        .layer(ValidateRequestHeaderLayer::basic("user", "super safe pw"));
This will use basic auth, and make the browser ask for a password nicely. This uses tower_http::validate_request::ValidateRequestHeaderLayer::basic and requires that we add the password in plaintext. If you are uncomfortable with this, which you should be in most scenarios, then you can also use the custom method to define a function that compares the hash of the provided values to a stored hash.
SSL-Certs
Using basic auth is only reasonable when the connection is encrypted, so let's set up TLS. Luckily, there is rustls_acme, which handles everything regarding the certificate automatically. Setting it up is a little more complicated than the other things we've done so far.
pub async fn serve_with_tsl(
    app: Router,
    domains: impl IntoIterator<Item = impl AsRef<str>>,
    email_for_lets_encrypt: &str,
    cert_cache_dir: impl Into<PathBuf>,
) -> Result<()> {
    let ccache: PathBuf = cert_cache_dir.into();
    if !ccache.exists() {
        fs::create_dir_all(&ccache).context("Creating Cache Dir")?;
    }

    let mut state = AcmeConfig::new(domains)
        .contact([format!("mailto:{email_for_lets_encrypt}")])
        .cache(DirCache::new(ccache))
        .directory_lets_encrypt(true)
        .state();

    let acceptor = state.axum_acceptor(state.default_rustls_config());

    tokio::spawn(async move {
        loop {
            match state.next().await.unwrap() {
                Ok(ok) => log::info!("event: {ok:?}"),
                Err(err) => log::error!("error: {err}"),
            }
        }
    });

    let addr = SocketAddr::from(([0, 0, 0, 0], 443));
    let tls_server = axum_server::bind(addr)
        .acceptor(acceptor)
        .serve(app.into_make_service());
    let redirect_server = mk_redirect_server();
    Ok(tokio::try_join!(tls_server, redirect_server).map(|_| ())?)
}
This will also require the crates axum_server, anyhow, tokio_stream and log.
This code was based on this example.
Of course, you could rewrite this a little to get rid of the usage of anyhow and log. They
are not required for this task, but I just like to use them.
This function first makes sure, that the directory, where AcmeConfig will
store the cached certificates, exists. Then it creates an AcmeConfig
instance, which will handle TLS and decrypt all data before axum processes it,
and then uses a low-level axum api to create a server that uses the state
object.
If you look closely, you will notice the function mk_redirect_server(). We use it
to also accept unencrypted requests, and forward them to the encrypted API:
async fn mk_redirect_server() -> std::io::Result<()> {
    fn make_https(host: String, uri: Uri) -> Result<Uri, Box<dyn std::error::Error>> {
        let mut parts = uri.into_parts();
        parts.scheme = Some(axum::http::uri::Scheme::HTTPS);

        if parts.path_and_query.is_none() {
            parts.path_and_query = Some("/".parse().unwrap());
        }

        parts.authority = Some(host.parse()?);
        let new_uri = Uri::from_parts(parts)?;
        Ok(new_uri)
    }

    let redirect = move |Host(host): Host, uri: Uri| async move {
        match make_https(host, uri) {
            Ok(uri) => Ok(Redirect::permanent(&uri.to_string())),
            Err(e) => {
                Err(StatusCode::BAD_REQUEST)
            }
        }
    };

    // Change to match where your app is hosted
    let addr = SocketAddr::from(([0, 0, 0, 0], 80));
    let listener = tokio::net::TcpListener::bind(addr).await.unwrap();
    axum::serve(listener, redirect.into_make_service()).await
}
also, to have a smoother main, we add this function:
pub async fn server_locally(app: Router, port: u16) -> Result<()> {
    let addr = SocketAddr::from(([127, 0, 0, 1], port));
    let listener = tokio::net::TcpListener::bind(&addr)
        .await
        .context("Creating listener")?;
    Ok(axum::serve(listener, app).await?)
}
and then use everything together in the main:
    // ...
    let app = Router::new().nest_service("/", host_name_router.into_service());

    if debug_mode {
        server_locally(app, 3000).await.context("Serving locally")?;
    } else {
        serve_with_tls(
            app,
            ["site1.my.domain", "site2.my.domain", "ext.my.domain"],
            "your.mail@something.org",
            "/path/to/cache",
        )
        .await
        .context("Serving with TLS")?;
    }

    Ok(())
By now there is some code in here that is not incredibly straight forward, but if you just look at the main:
async fn main() -> Result<()> {
    let site1_svc = Router::new().nest_service("/", ServeDir::new("/tmp/serve_dir"));
    let site2_svc = Router::new().nest_service("/", ServeDir::new("/tmp/serve_dir2"));

    let debug_mode = !std::env::args().any(|x| x == "--production");
    let (name_site1, name_site2, external_app) = if debug_mode {
        (
            "site1.localhost:3000".to_string(),
            "site2.localhost:3000".to_string(),
            "ext.localhost:3000".to_string(),
        )
    } else {
        (
            "site1.my.domain".to_string(),
            "site2.my.domain".to_string(),
            "app.my.domain".to_string(),
        )
    };

    let client: Client =
        hyper_util::client::legacy::Client::<(), ()>::builder(TokioExecutor::new())
            .build(HttpConnector::new());
    let rev_proxy_svc = Router::new()
        .nest_service(
            "/",
            (|state, req| reverse_proxy_http_handler(3001, state, req)).with_state(client),
        )
        .layer(ValidateRequestHeaderLayer::basic("user", "super safe pw"));

    let hostname_router = mk_hostname_router(
        [
            (name_site1, site1_svc),
            (name_site2, site2_svc),
            (external_app, rev_proxy_svc),
        ]
        .into(),
    );

    let app = Router::new().nest_service("/", hostname_router);

    if debug_mode {
        server_locally(app, 3000).await.context("Serving locally")?;
    } else {
        serve_with_tls(
            app,
            ["site1.my.domain", "site2.my.domain", "ext.my.domain"],
            "your.mail@something.org",
            "/path/to/cache",
        )
        .await
        .context("Serving with TLS")?;
    }

    Ok(())
}
It is very easy to immediately grasp what this server does.
You can take a look at the complete example on github
The good, the bad and the ugly
I've been running this for a year now and created two more very similar servers since then. I'm very happy with the setup. It's easy to deploy (if you compile it against musl), it's easy to maintain, and it works well.
It is not actually objectively easier than running nginx, but if you are a software developer you might be part of the group that prefers this solution. One of the biggest advantages is that you have the full power of Rust at your fingertips and are not suddenly limited by nginx.
One downside is that this is slower than nginx and if you expect high loads, you will need to tune this, which is its own field of expertise. Another downside is that just because you can do everything, it's not neccesarily easy. For example, I also had websocket reverse proxying integrated. This is needed to play Pathfinder 2e via FoundryVTT, and for 6 months it worked. Then a FoundryVTT update came along and suddenly it stopped working. I still didn't have the time to fix this or to diagnose the problem. I just re-enabled nginx, just for FoundryVTT.
However, if you have a problem that is easier solved by using nginx, there is nothing stopping you from using nginx for that. You can still use this approach for the rest. To me, this is still a better solution than using nginx for everything.